Cast of Characters

Perficious Eats - Mommy on the lookout for the tasty bite no matter where we live

Mister Obvious - Mountain biking Daddy who makes ice cream, roasts his own coffee beans, and eats everything in sight

Sweet Pea - 12-year old girl who loves reading, math games, tennis and hiking

Little Man - 10-year old who can't get enough biking, running, and laughing

Thursday, 23 December 2010

Mini Mincemeat Pies

Nigella Lawson is the person I turn to for fun British holiday ideas.  These tiny star-studded pies are a great concept, as I often think that the traditional mincemeat pie is too big.  After a large Christmas meal, I like to have a little nibble of something with coffee (or a few little nibbles of different things).  

You will need a mini-muffin pan or mini tart tin, with each indent 4.5cm/1¾in diameter.  You will also need a 5.5cm/2¼in round fluted biscuit cutter and a 4cm/1½in (approx.) star-shaped cookie cutter and/or heart shaped cookie cutter.  (I didn't think that I had cookie cutters this small, but Dr. Tex pointed out that my daughter's kitchen play set did.  Perfect!)

As for pie dough, I hate using vegetable shortening.  There's just something about it that really turns me off.  So I used my favorite pie dough recipe, but here I include Nigella's crust because, after all, it is her mincemeat pie recipe.  There really is something so wonderful and Christmassy about standing at the stove and sniffing the air as these cranberry jewels simmer in the glorious mixture of spices, juice and spirits.

Mincemeat Ingredients:
Mincemeat Method:

  1. In a large pan, dissolve the sugar in the ruby port over a gentle heat.
  2. Add the cranberries and stir.
  3. Add the cinnamon, ginger and cloves, currants, raisins, dried cranberries and the zest and juice of the clementine.
  4. Bring to a gentle simmer and cook for 20 minutes, or until the fruit has broken down and has absorbed most of the liquid in the pan. (You may need to squish the cranberries a little with the back of a wooden spoon to incorporate them fully.)
  5. Remove from the heat and allow to cool a little.
  6. Add the brandy, almond extract, vanilla extract and honey and stir well with a wooden spoon to mash the mixture down into a paste.
  7. Spoon the mincemeat into sterilised jars and, once cool, store in the fridge for up to two weeks.
Pie Crust and Mincemeat Pie Assembly Ingredients:
240g/8oz plain flour
60g/2oz vegetable shortening
60g/2oz cold butter, cut into small cubes
1 orange, juice only
pinch salt
icing sugar, for dusting
350g/12oz Christmas mincemeat


Mincemeat Pie Assembly and Baking Method:
1. Sift the flour into a shallow freezer-proof bowl, then add small mounds of vegetable shortening.
2. Add the butter, shake to cover it, then place into the freezer to chill for 20 minutes. (This will make the pastry tender and flaky.)
3. Mix the orange juice and salt in a separate bowl. Cover and leave in the fridge to chill.
4. After the 20 minutes, empty the chilled flour and shortening mixture into the bowl of a food processor and pulse to make porridge-like crumbs.
5. Gradually add the chilled salted orange juice, pulsing until the mixture is just coming together as a dough. Stop just before it comes together (even if some orange juice is left). If all the juice is used up
before the dough has begun to come together, add some iced water.
6. Turn the mixture out onto a clean, floured work surface and, using your hands, knead the mixture to form a dough.
7. Divide and shape into three equal-sized discs (you'll need to make the mince pies in three separate batches of 12, unless you've got enough tart tins to make all 36 pies at once).
8. Wrap each disc in cling film and place into the fridge to rest for 20 minutes.
9. Preheat the oven to 220C/425F/Gas 7.
10. Remove a pastry disc from the fridge and roll out on a floured work surface thinly, but so that it will be sturdy enough to support the dense mincemeat filling.
11. Using a fluted pastry cutter, cut out 12 circles a little wider than the moulds in the tart tins. Press the circles gently into the moulds.
12. Place a teaspoon of mincemeat into each pastry case.
13. Reroll any remaining dough to a similar thickness, then using a star-shaped cutter, cut out 12 stars and place each lightly onto the mincemeat filling.
14. Transfer to the oven and bake for 10-15 minutes, or until the pastry is golden-brown. Keep an eye on them as they don't take very long to cook.
15. Remove from the oven, prising out the little pies straight away and placing onto a wire rack to cool. Allow the empty tray to cool down before repeating the steps from step 10. Repeat until you have
made 36 mince pies.
16. Dust the mince pies with icing sugar and serve.

Wednesday, 15 December 2010

Carluccio's, Cambridge and Bury St. Edmunds

When Major Obvious and I have a free morning together, we usually make our way to Carluccio's in either Cambridge or Bury St. Edmunds.  I can't get enough of their Eggs Benedict which are served over deliciously grilled bread instead of the traditional muffins.  My dining companion is in love with the mushroom and onion egg scramble.  The lynchpin of the meal, however, is the Bicerin, a Tuscan espresso drink that magically combines the wonderful worlds of gooey chocolate, sharp coffee and heavenly whipped cream.  The servers at Carluccio's know us by now and always show us to the same cozy booth.  Major Obvious happily sips his Bicerin as I admire the gorgeous holiday decorations and revel in being surrounded by stacks and stacks of Christmas panettone luxuriously wrapped in golden paper and bows.  After we dine, we never resist a visit to the deli and shop where we stock up on teddy bear brownies for the kids, Italian candies for later, and hard-to-find items like squid ink pasta.  A visit to Carluccio's always proves fun, but it's even more indulgent and spectacular during the festive season.

Monday, 22 November 2010

Holiday Bake Sale


My kids' primary school is a little eager to kick off the holiday season.  It just hosted the annual Christmas Fair this past weekend.  I suppose that with no reality check of Thanksgiving to get in the way, the steam roller that is Holiday Madness starts right after Halloween.

One of my British friends came up with the brilliant idea of hitting up the local grocery store for some bakery boxes.  We were able to sell loads of cupcakes by giving customers the option to get a package of 4.  Don't they look cute and festive? 

Making these is a snap.  You just need:

Red Velvet Cake mix
Foil cupcake wrappers
Ready-made icing (I used Pilsbury Vanilla) and
Candy canes
Optional:  pastry bag with star tip

I know, I know.  Cake mix?!  Ready-made icing?  I must admit that I usually rely on such terrible tactics for bake sales. 

1.  Bake the cupcakes and freeze them until ready to use.  (You could do this 2 weeks in advance, if you wanted.)
2.  On the day of the bake sale or holiday fair, line up the cupcakes on paper towels or wax paper.
3.  Squirt the icing out of a pastry bag if you want or spread on with an off-set spatula.  (I used the star tip, but these would be super pretty with the ribbon or circle tip as well.  You are only limited by your imagination.)
4.  Crush some candy canes by putting them into a Ziploc bag and then wacking with a rolling pin or some such tool.  (I used the handle of my kitchen shears because they were right on the table already).
5.  Sprinkle candy canes on cupcakes.  Pack into boxes and watch them sell out right before your eyes!  Don't worry about the fact that the cupcakes are frozen...they will thaw about 2 hours after you take them out of the freezer.  By the time you decorate all of them, pack them up and drive them over to the school, you're probably home free!

Note:  Other fun decorations would include holiday Peeps...I've noticed that they come in snowman and Christmas tree options.

Wednesday, 3 November 2010

Butternut Squash and Pear Soup with Vanilla Bean Specks

The first little sniffles and coughs of the season have started to resonate through the house.  My kids, however, are really tired of chicken noodle soup from previous years.  So this fall, I had resolved to introduce some new soups into the recipe stash.
This is largely lifted from Molly Wizenberg's version of Butternut and Pear Soup with Cider and Vanilla Bean, except I didn't use any cider and I didn't use a separate pan to infuse the vanilla bean into the cream.  My sink was already full of dirty dishes...I didn't need to introduce a saucepan to the growing pile.
3 Tbs olive oil

1 2-lb butternut squash, peeled, seeded, and cut into 1-inch pieces (4 generous cups)

2 firm-ripe pears, peeled, cored, and cut into 1-inch pieces (about 2 cups)

1 medium yellow onion, peeled and coarsely chopped

3 cups good-quality chicken broth

½ tsp salt

½ cup half-and-half (I used 1/2 cream and 1/2 milk)

1 vanilla bean

Fresh chives, finely chopped, for garnish
Heat the oil in a Dutch oven or stockpot over medium-low heat. Add the squash, pears, and onion, stir to coat with oil, and cook, uncovered, stirring occasionally, for 10-15 minutes, until the onion is soft and transparent and the pears are starting to fall apart.
Add the broth and bring the mixture to a boil over medium-high heat.  Then reduce the heat to medium-low, and simmer the mixture, partially covered, for about 30 minutes, until the squash is tender.
Puree a third of the mixture in a food processor (or use an immersion blender).  Once it's pureed, then add another third, puree, and then the final third.  I like to make sure that the feeding tube at the top of the processor is open so the steam from the hot liquid can escape.   (I don't know what happens if you process an entire pot's worth of hot liquid in one shot without a vent; it seems like a bad idea).

Before you put the soup back into the pot, pour the half-and-half (or cream and milk) into the pot (don't worry about the remains of squash and onions left in the pot...this is all going to become soup anyway).  Scrape the contents of a vanilla pod into the half-and-half and warm until it is steaming and smells heavenly.  (You can also chuck the vanilla pod itself into the half-and-half while this is happening, just remember to take it out before you serve it).

Pour the soup back into the pot and stir.  Serve, garnished with chives.  You can also use a little more cream to make a decoration on the soup (like a happy face or a flower to cheer up a sniffly little sweetie).  I usually just put a little bit in a Ziploc bag, snip off a corner with scissors, and squirt onto the soup.  You'd be surprised how eager your kids are to eat something with a happy face on it.  

Yield: 4-5 servings

Tuesday, 26 October 2010

Say Fromage...

One of the highlights of my Paris experience this past week was a visit to Alleosse, the famous cheese shop.  Believe it or not, I was looking for this store and actually passed it the first time walking down the street.  How does someone miss a pink cheese shop?  Picture throngs of food stalls, fruit carts, shoppers purchasing their wares for dinner, seafood mongers calling to customers, the aroma of rotisserie chickens and fries wafting through the market, and you might get a sense how that would be possible.  The market at Rue de Poncelet is quite an experience, one that merits its own entry.

And here is where I introduce my good friend Audi Girl, a dangerous specimen with my passion for food and Major Obvious' obsession with cars.  Audi Girl and I joined the queue that spilled from the shop into the street.  She was anxious to try some brie, while I had a couple of other cheeses in mind to purchase.  As we entered the shop, we were completely overwhelmed.  The store was packed with cheese everywhere!  Cases, shelves and nooks were crammed with delicious possibilities.   The smell was also incredible.  Almost every cheese came with a little tag that said, "Cru Lait," which means raw milk.  That's right, nothing was pasteurized here!  Hence, the lovely, funky smell that only can be found in a lovely French cheese shop.  Audi Girl whispered,  "I don't see Brie anywhere."  She was right, even though we were surrounded by a million cheeses, none of them had the label "Brie."  I had faith, though.  "They've got to have it."

Three men in white chef's jackets were standing at attention, ready for action.  When it was finally our turn, I requested "Brie de Meaux" and our assistant called out, "Brie de Meaux!  Oui, madam!"  Then he reached into a vast glass case and pulled out an enormous wheel.  He motioned with his hand where I might want it cut.  I nodded, and he cut.  Then, he wrapped.  Next?  "Camembert."  He pulled out a smaller wheel and asked me something in rapid French.  I thought he was asking me if I wanted to buy the whole thing, so I asked, "C'est possible...demi..." and made cutting motions with my hands.  He replied that he could definitely do that, cut and wrapped it.  At this point, Audi Girl whispered in my ear, "He was asking which day you were going to eat it."  Oops.  Well, we were definitely going to eat it today.  No matter.  Onto the next cheese!  "Neufchatel, sil vous plait."  Repeat, show for inspection, wrap.  Is that everything?  Yes, we're done, thank you.  He prints out a little ticket, then I realize that I need to stand in another line.  I came to learn that Parisians often stand in line twice at shops.  So I presented my ticket to the cashier, at which point he miraculously produced a little pile of wrapped cheeses, all the correct ones I had requested.  Audi Girl was impressed, "I was wondering how they were going to keep track of our cheeses!"

So what was our favorite?  The Brie de Meaux was Audi Girl's and Major Obvious' favorite.  I preferred the softer and tangier Camembert.  But our best cheese find was at Cafe Angelina two days later.  Audi Girl ordered a plate that came with some Brillat-Savarin.  Fresh and snowy white, it tasted like the butteriest cream cheese ever.  Now I know what to ask for next time at Alleosse!

Wednesday, 1 September 2010

By Jove! Tearoom, Burwell, Cambridgeshire


Dr. Tex was gracious enough to treat us to a sumptuous tea at By Jove! tearoom, a charming English house nestled in Burwell.  I loved the enormous sandwiches (the "fingers" that inspired these likely belonged to the Jolly Green Giant), the homemade cake, and the iPod dock secreted behind a vase of flowers.  There are also two little gift shop rooms that sell hilarious things like hand-knitted tea cozies, notebooks with the Queen of England's portrait on the cover, and tartan passport covers.  (Oddly enough, there were also Wizard of Oz mint tins, which did not strike me as either British or tea-related, but oh well).  

Each of us had the traditional set afternoon tea which came with the aforementioned enormous "finger" sandwiches (egg salad, tuna salad, and cucumbers with butter), a ridiculously large "slice" of cake of your choice, two raisin scones served with clotted cream and jam, and tea or coffee.   I was warned to come hungry, so I made a point of eating nothing all day long in an effort to "conquer" this tea.  Well, I managed to devour all of the sandwiches and one of the scones, but I ended up taking home the cake for Major Obvious and the kiddies to share.  Oh, and I took home the other scone, too, but I ended up eating it before I had a chance to tell anyone about it.  These things sometimes happen.

Saturday, 7 August 2010

The Rose & Crown, Snettisham, Norfolk


On our way back from Norfolk Lavendar, we stopped off at The Rose & Crown.  This charming gastropub serves up an incredible variety of delicious food.  Skyscraper-high cheeseburgers on ciabatta with bacon, matchstick French-style fries (no thick English-inspired chips here, to the delight of Sweet Pea), crispy pork belly served alongside grilled peaches, sauteed scallops and halibut on a bed of black risotto...everyone found something delicious to devour.  We even had the opportunity to try something new...the scallops and halibut were served with a side of marsh samphire.  It seemed odd to eat these vegetables, as they looked like the plastic plants that one would find in someone's aquarium.  But this sea plant consisted of pods along a rosemary-like stalk that exploded with salty flavor when we bit them.  Complete with a children's menu, friendly staff, and a fun layout made up of multiple little rooms, The Rose & Crown is a fabulous lunch stop and we look forward to going again.

Sunday, 1 August 2010

Dinner in Edinburgh...With Kids!

We ate a lot of Italian and Scottish food while in Edinburgh, but it seemed that our favorite stop might have been at Mussell Inn.  It was so much fun sitting outside during a calm summer evening and watching Sweet Pea devour mussell after mussell.  Our server was duly impressed when he saw her empty mussell pot, "Where are you putting it?  You're so tiny!"  

If you find yourself in Edinburgh, you might want to stop off at Martone for some homemade gelato and pizza.  Centotre, located in a gorgeously restored Georgian mansion, offers freshly made pastas and fun activity packets for kids.  

Scottish Brunch and Tea


I just spent the past several days in Edinburgh, Scotland with the family.  Perhaps our favorite activity was eating brunch or having tea there.  This wonderful city has no shortage of places!  We loved our butternut squash risotto at Always Sunday (served on top of a butternut squash half so that you just scoop out more squash while you're eating the creamy rice). Major Obvious and the kids enjoyed munching on bacon and Belgian waffles at Treacle while watching reruns of Streetfighter cartoons.  I particularly loved the smoked salmon sandwiches and shopping at eteaket, where the kids were delighted to partake in their first "babyccinos" (steamed, foamy milk with swirls of cocoa on top).  The hog roast sandwiches at oink are super tasty as well.      

Tuesday, 8 June 2010

More London Finds

While hanging out in Knightsbridge for a few days, we found some more yummy treats in London.  My mother uncovered the treasure that is Harvey Nichols' Lime and Coconut Curd.  Completely sublime and utterly decadent!

We also loved dining at Da Scalzo on Brompton Road, a dream-come-true Italian restaurant that manages to tick all the boxes.  They serve breakfast (heavenly Eggs Benedict), make wonderful pizzas, turn out the best mushroom risotto I've ever tried, and are somehow child-friendly.  How do they do it?  I have no idea, but it's amazing.  They also have an incredible bakery that turns out fabulous almond croissants, eclairs, tiramisu, homemade donuts and chestnut meringues that you are more than welcome to take home with you in case you ate too much Italian sausage and mash.  It's the perfect stop after marveling at the Chihuly sculpture at the Victoria & Albert, having butterflies land on you at the Natural History Museum, or checking out Lewis Hamilton's F1 car at the Science Museum.

If you'd like to enjoy the famous Fortnum & Mason experience with kids, skip the St. James room at head to The Parlour Restaurant.  You can partake in quail egg and ham or rare roast beef sandwiches while the kids devour grilled cheeses, then dive into fabulous ice cream sundaes or ethereal coffee drinks.  With unique flavors such as stem ginger honey and old favorites like chocolate, mint chocolate chip or toffee, nobody will be disappointed.  

Thursday, 27 May 2010

The Easiest Chicken In The World

Even though I love those recipes with the gigantic picture of a seven-layer chocolate cake iced to perfection, I must confess that I get most excited about the recipes that I use all of the time.  Don't you just get so jazzed when you read a magazine and there's an idea for a quick, easy and tasty dinner?  I think to myself, "Why didn't I think of it before?  Thank you, Mr./Ms. Celebrity Chef!!!"

Nigella Lawson is one of those great cooks who has fabulous ideas that work in the everyday kitchen.  I discovered this methodology of hers and use it once a week.  The beauty of this method is that it is extremely forgiving.  You can use 6-12 drumsticks (or any part of the bird, for that matter).  You can use buttermilk or yogurt (although I've found buttermilk to yield chicken that is more tender).  You can use lots and lots of cumin.  You can substitute honey for maple syrup, or you can omit that part all together.  Usually, I just eyeball everything and scoop it into the bag.  Enjoy!

Buttermilk Chicken Drumsticks


12 chicken drumsticks (approximately 1.25kg/3lbs total weight) 
500ml/17fl oz buttermilk 
60ml/2fl oz canola oil, plus 2 tbsp extra for drizzling 
2 garlic cloves, peeled and lightly crushed 
1 tbsp sea salt or 1½ tsp table salt 
1 tsp ground cumin 

1 tbsp crushed peppercorns or freshly ground pepper (optional)
1 tbsp maple syrup (optional) 

1. Place the chicken drumsticks into a large plastic freezer bag and add the buttermilk and 60ml/2fl oz of canola oil. 

2. Add the lightly crushed garlic cloves to the bag along with the crushed peppercorns and salt. 

3. Sprinkle in the ground cumin and add the maple syrup, then gently squeeze the bag to mix the marinade ingredients together and coat the chicken. 

4. Seal the bag, place it on top of a plate, and leave the chicken to marinate in the fridge, ideally overnight, or out of the fridge for at least 30 minutes and up to two hours. 

5. Preheat the oven to 220C/425F/Gas 7. 

6. Take the chicken pieces out of the bag, shaking off the excess marinade, and arrange them in a roasting tin lined with foil.

7. Drizzle over the remaining two tablespoons of oil, then transfer to the oven and roast for about 30 minutes, or until golden-brown and completely cooked through. 

Wednesday, 12 May 2010

The Artichoke Lover In You


I've recently discovered a wonderful blog about...artichokes.  Crazy, right?  Well, look at these delicious dishes!  The author of On Artichokes in Italy travels around the country researching how various artichokes are grown, sampling gorgeous-looking plates, and inventing recipes as well.  Hopefully I will soon be able to try one of these recipes out.  In the meantime, the photos almost satisfy the hunger.  Almost!

Tuesday, 13 April 2010

Springtime for Yummies in Germany - Munich

Spaghetti Ice Cream Sundae


This past week I was in Munich, Germany and had the fortune to eat a lot of fantastic food.  Munich is a charming Bavarian city that has somehow maintained a traditional feel even in this modern time.  It is also not that far from Italy, which accounts for its amazing Italian food offerings.  Sausages, beer and schnitzel for lunch, pizza and pasta for dinner, and Michelin-star chef concocted ice-cream in between...wunderbar.  See the Tasty Eats column on the right for restaurant information!  Each place has great food AND you can bring little kids!

Sunday, 11 April 2010

Tea Time In Britain

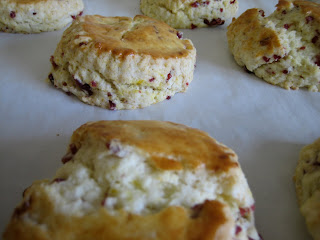
I recently attended a baby shower where the guests were asked to bring tea time treats.  This recipe is not traditionally British.  Instead, it hails from Southern California...the Hotel Bel Air, to be exact.  But it yields flaky and delicious scones!

I've discovered that the secret to adding dried cranberries or currants is to chop them really finely into a mince.  That way, the flavor gets strewn throughout the pastry without ruining the delicacy of the dough.  I've also changed the methodology a bit in that I use a food processor.  It's so much faster this way.


Cranberry Orange Scones, largely taken from the Hotel Bel Air Airy Scone recipe

3 cups cake flour
2 T baking powder
2 T sugar
3/4 t salt
1/2 c unsalted butter, cold and cubed
2 c whipping cream
1 c dried cranberries, chopped finely (optional)

zest of 1 orange (optional)
1 egg yolk, beaten with a little cream or milk
Clotted or Devonshire cream and best quality preserves

Preheat oven to 375 degrees. 

Sift together dry ingredients. Place into food processor with cold butter and pulse until ingredients are mealy.  Once the ingredients are mealy, continue pulsing while adding the cream, until the dough almost comes together.  Add the cranberries and orange zest, then pulse until the dough forms a mass. 

Place dough on floured surface and roll out to 3/4 inch thick. Cut into 2 1/4 rounds. Brush with egg yolk mixture, plan on parchment covered baking sheet, and bake 18-20 minutes until golden brown.

Sunday, 14 March 2010

A Love Affair With Neil, The Local Butcher

My friend, Bacon, (so-called because he is convinced that "Bacon is a Vegetable,") may be having an affair with the local butcher.  Every other day, Bacon will call me and say something like, "Neil gave me 20 chicken wings," or "I gave Neil some chipotles in adobo," or "Neil wants me to come over and watch a rugby match,"or perhaps, "I took some chili over to Neil."

I think it takes an intimate relationship with a butcher to make sense of British cuts of meat, as they are often not the same as American ones.  A British butcher does not know what the heck you are talking about if you march in and ask for some short ribs or tri-tip.  So, I think Bacon is onto something here.  Especially since one day, Bacon called to announce, "Neil gave me a ton of those Jacob's Ladders.  You should take some."  (Jacob's Ladder, incidentally, is a rack of Short Ribs.  We finally figured that out, after getting various cuts from the cow.  I even once tried to explain to Neil which ribs I wanted, demonstrating on my own body.  It was slightly embarrassing to stand in the middle of a local butcher shop and have 3 butchers in bloody aprons watching me point to my own torso over and over again.  And even more annoying to come home with the wrong cut, revealing that perhaps I stink at Butcher Charades.)

Bacon's wife, Dr. Tex, doesn't seem to mind.  After all, she gets to eat lots of tasty meals (although she's not as into meat as her husband.  Few are.)  So now that Bacon and I have all of these short ribs, the challenge is finding the recipes that best showcase this lovely, inexpensive cut of meat.  It's a good value, even for those of you who aren't in love with your local butcher!

Penne With Short Ribs, by Giada DeLaurentiis

Ingredients

  • 4 pounds beef short ribs
  • Kosher salt and freshly ground black pepper
  • 1/4 cup olive oil
  • 1 large onion, diced
  • 3 cloves garlic, coarsely chopped
  • 5 Roma tomatoes, cut into eighths
  • 1 cup red wine, such as Cabernet Sauvignon (or 1 cup chicken or beef broth, see Note below)
  • 3 tablespoons Dijon mustard
  • 2 cups low-sodium beef broth
  • 1 pound penne pasta
  • 1/4 cup freshly grated Parmesan
  • 1/4 cup chopped fresh flat-leaf parsley

Directions

Place an oven rack in the lower 1/3 of the oven. Preheat the oven to 350 degrees F.
Season the ribs with salt and pepper. In a large heavy-bottomed Dutch oven or ovenproof stock pot, heat the oil over medium-high heat. In batches, add the ribs and brown on all sides, about 8 to 10 minutes. Remove the ribs and set aside. Add the onion and garlic and cook, stirring frequently, for 2 minutes. Add the tomatoes, wine and mustard. Bring the mixture to a boil and scrape up the brown bits that cling to the bottom of the pan with a wooden spoon. Return the ribs to the pan. Add the beef broth, cover the pan and place in the oven for 2 1/2 hours until the meat is fork-tender and falls easily from the bone.
Remove the ribs from the cooking liquid. Using a large spoon, remove any excess fat from the surface of the cooking liquid. Using a ladle, transfer the cooking liquid in the bowl of a food processor. Process until the mixture is smooth. Pour the sauce into a saucepan and keep warm over low heat. Remove the meat from the bones. Discard the bones. Using 2 forks, shred the meat into small pieces. Stir the shredded meat into the sauce. Season with salt and pepper, to taste.
Bring a large pot of salted water to a boil over high heat. Add the pasta and cook until tender but still firm to the bite, stirring occasionally, about 8 to 10 minutes. Drain the pasta and place in a large serving bowl. Using a slotted spoon, remove the meat from the sauce and add to the pasta. Pour 1 cup of the sauce over the pasta. Toss well and thin out the pasta with more sauce, if needed. Sprinkle the pasta with Parmesan cheese and chopped parsley before serving.
Note:  I substituted 1 cup of chicken broth for the 1 cup of wine because I didn't think my kids would like the flavor of the wine.  The substitution worked out fine, although it meant that the acid level of the braising sauce wasn't that high, which meant that the ribs didn't break down as much as they otherwise would.  To shred the meat, I had to take it off in big chunks with two forks, then chop it up really small with a chef's knife.  The meat chopped up very easily because it was still pretty tender.  Then, I stirred the chopped meat back into the sauce and let it sit for a couple of minutes so that the meat would absorb the sauce.  After that, I put in the pasta, tossed to combine, and topped with the parsley and cheese.  

Tuesday, 9 March 2010

On a Hazelnut Mission


What is it about the hazelnut?  All I know is that if you put it in a cake, cookie, pastry or ice cream, you will also have to wrestle me to the ground in order to keep me away from it.  

So when I watched a cooking show called "Catherine's Italian Kitchen," on GoodFood (UK's version of Food Network), I was extremely intrigued when Catherine visited the Nebrodi mountains in Northern Sicily.  Gaetano Calamunci owns a pastry shop/ice cream factory in the tiny town of Sinagra and makes all kinds of delectable looking treats.  Now, I had assumed that I had pretty much seen it all when it comes to sweets, but this guy takes decadence to a whole new level.  For breakfast, he is known to take a freshly baked brioche, slice it open, and spread on a generous helping of hazelnut gelato.  Then, to finish it off, he'll throw a handful of toasted hazelnuts on top of the ice cream before he closes up the amazing sandwich.

Sadly, I am not planning a trip to Sicily in the next few months, yet I feel like I must try something made by this master craftsman soon.  Calamunci makes all kinds of treats that he is willing to ship, thankfully.  I was delighted to discover that he had a website and gladly took orders (for a minimum of 25 Euros).  Unfortunately, I am not that seasoned when it comes to ordering goods from the Italian Internet.  So, someone may or may not show up at my doorstep with 5 jars of hazelnut spread and 1/2 kilo of hazelnut cookies, demanding cash on delivery.  Stay tuned!

In the meantime, if you are lucky enough to be heading towards the Land of Hazelnuts, visit Calamunci's and give us a full report!  http://www.pasticceriacalamunci.com/

Sunday, 7 March 2010

Potstickers - The Perfect Oscar Party Starters!

Let's face it, the powers-that-be are not predicting too many surprises this year for the Academy Awards.  For your Oscar pool, you are choosing between "Avatar" and "The Hurt Locker," and the accolades for actors supposedly will go to everyone who snagged the Golden Globes.  So, how to make your Oscar Party exciting?  Fabulous cocktails, obviously. And...fun appetizers!

Potstickers are one of those great little wonders that everyone loves.  If your guests do not eat meat, fill the little gyoza wrappers with grated veggies instead.  You are only limited by your imagination.  If it sounds like it would taste good fried in a crunchy wrapper, then it probably will!  Throw it in and see what happens.

Potstickers
Ingredients:
2 lb ground pork (ground turkey is fine)
3-4 cups shredded cabbage (I like to buy the pre-shredded cole-slaw cabbage to cut down prep time)
3-4 green onions, minced
2 Tablespoons freshly grated ginger
1 package of medium tofu (medium firm is fine)
1 egg
3 Tablespoons soy sauce
3 Tablespoons sesame oil
2-3 packages gyoza wrappers (won ton wrappers are too thin for these dumplings)

You will also need:
2 large cookie sheets/baking trays/platters lined with wax paper or parchment paper
1 small bowl filled with water
1 damp paper towel or kitchen towel
1 large, heavy frying pan with a tight cover (a glass cover makes frying the dumplings easier)
1 small bowl filled with water for frying

Place all ingredients except for the wrappers into a large bowl.  Mix together with your hands or a large wooden spoon until everything is incorporated together.

Gather together your other materials at a table where you can spread everything out and sit comfortably.  Take one wrapper and put a rounded tablespoon of filling onto one side.  Dip a finger into the small bowl of water and brush your wet finger at the edge of half of the wrapper (Do not go all the way around the whole wrapper, just make a half-circle).  Fold the wrapper into a half-moon shape, using the water you brushed on to act as an adhesive and close the dumpling into a half-moon shape.  (A lot of people pleat the top skin to make a pretty fan, but I really can't be bothered with such nonsense when I'm making a bazillion little dumplings).

After you've made one dumpling, lay it on the lined tray and repeat until you're out of filling.

If you would like to eat the dumplings immediately, begin the frying process, or keep the dumplings in the refrigerator/freezer until ready.  (Make sure your dumplings are in a single layer so that they don't stick together).

To fry, heat a few tablespoons of canola oil in the frying pan over medium high heat.  Place the dumplings onto the pan in a single layer, arranging them in rows.  Once the bottom of the dumplings are slightly cooked but before they turn golden, pour about 1/3 to ½ cup of cold water over the dumplings, making sure that all tops of the dumplings are moistened.  Cover the pan and cook until the dumplings are transparent.  Remove the dumplings from the pan onto a serving platter, fried side up.  Serve with Potsticker Sauce.

Note:  Major Obvious likes his potstickers fried and crunchy on both sides, so after the potstickers are transparent, I will lift the cover, flip the potstickers with wooden chopsticks, and let them crisp up on the other side.  The traditional way to eat them, however, is crunchy on one side and soft on the other.  The choice is yours!

Potsticker Sauce
1 bottle soy sauce
1 bottle sesame oil
1 bottle hot chili oil

Give your guests their own little sauce dishes and encourage them to make their own potsticker sauce to their own liking, by mixing the soy sauce, sesame oil and hot chili oil.  (Some guests may choose to forgo the hot chili oil altogether).

I like to make a big, big batch of these and freeze them for convenience food at later times.  To do so, place your tray of potstickers in the freezer.  Once frozen, place the potstickers in a large, labelled freezer storage bag.  Potstickers will keep for 6 weeks.